

How To Make A Camera Dolly
DIY: How to Build a Camera Dolly
For those of you new to a filmmaking, the first question is: what is a photographic camera dolly? Quoting from Wikipedia:
"A camera dolly is a wheeled cart or similar device used in filmmaking and flick/television production to create smooth camera moments"
A dolly is a staple slice of equipment for many professional person and indie films alike. It ordinarily consists of a rail ranging from a length of 10 anxiety to 50 feet and sometimes even further. Professional tracks are generally made of aluminum and other light metals (whereas most DIY tracks are made out of PVC).
Dollies are used quite frequently in films because they allow smoothen movement of the camera to follow action and to create tension or add depth. With a dolly you can go forward, backward, side-to-side, and even diagonal. And with the right kind of tracking/wheel combination, you can even become in circles and big curves.
It can be a motorized camera dolly or it can be operated by a photographic camera operator and a focus puller to button the dolly dorsum and along.
As a filmmaker, you must constantly figure out ways to improve the production value of your projects, and a camera dolly is a valuable piece of equipment to do just that. Allow's examine the iv means a dolly can make impact your film project:
- Tracking shots – When a dolly is used, information technology's like a camera on tracks. Information technology mimics the movement of the discipline in frame. For example, information technology can go sideways from left to right to rail the motility of actors. The photographic camera creates a dynamic movement to keep the audition interested in the scene. Instead of having static actors talking at each other, why non have them moving left to right with the a dolly to track their movement equally they speak? It's much more interesting.
- Pushing in and out– Instead of using the camera to zoom in and out with the lens, you lot can put a portable dolly on tracks and the entire piece of equipment zooms in and out, usually on tracks. This motility highlights the importance of a particular graphic symbol and what he or she has to say at that moment in time.
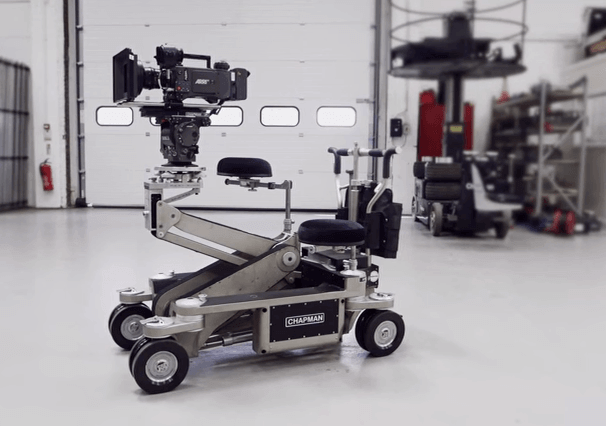
- Moving upwardly and downward– Usually, this motion can be done with a camera jib. But there are dollies that can perform this role, such as products made by JL Fisher and Chapman.
Hither'south an case of an EPIC tracking shot fromSpectre:
WHEN You HAVE BILLIONS OF DOLLARS, You lot TOO CAN MAKE THIS AMAZING TRACKING SHOT.
For about beginner filmmakers, purchasing a dolly is usually non an choice. Non simply does it cost money, merely yous actually demand to know what y'all're doing or you could end up dissentious your camera. There is the possibility to rent out a dolly from a reputable vendor. Some places you can try:
- Kitsplit
- B&H
Dollies make a big difference in whatever film project, and are very very useful. Nevertheless, to buy a professionally-made dolly from a vendor, yous tin can spend hundreds of dollars for simply a decent one. Most indie filmmakers can't beget that kind of dough, so instead they make their own. And that's exactly what I did; I fabricated my very own photographic camera dolly!
Hither's what I did to create a portable, lightweight dolly:
I took i of those studio dollies, the kind with the crappy rubber wheels and the three-prong design. They're more often than not used by photographers in studios to movement effectually a tripod easily. The heavy-duty kind are used in TV studios to move around those behemothic boob tube cameras. The one I used is one of the cheaper kinds you lot can become off Ebay and other discount stores.
The first important thing about DIY dollies are the way the wheels are mounted. To use them effectively, they should be mounted at an bending to assistance stay on the rail. The utilize of bending fe allows a mountable surface just perfect for making the wheels angled.
And then I bought some bending iron with pre-drilled holes in it (how convenient) which you lot can go at your typical hardware shop. Luckily the bolts from the studio dolly were simply the right size to fit through the holes drilled into the atomic number 26, and then all I had to practice was screw in the angled iron where the wheels used to go. I really got off easy at that place. In almost other cases you'll have to drill through some metal to mountain the iron to whatever you're using, and then be careful.
To adjutant with the mounting of the wheels, I bought some washers, bolts, and basics. They were all 3/8″ size, but the sizes might be different co-ordinate to invididual circumstances. I also got some nylon spacers to space the wheels abroad from the angled fe. Again, all of these parts tin exist found at a hardware store. Nothing obscure, I promise.
The second important thing about dollies are the wheels themselves. I've seen people utilise skateboard wheels, roller skate wheels, and allow'due south not forget rollerblade wheels. To be frank, it doesn't thing what is used, every bit long every bit the wheels come up with bearings. Without bearings the wheels will catch and hang on the bolts used to adhere them to the angled iron. With bearings, the rolling is smoothen. I recommend using rollerblade wheels and cipher else. I bought a set of 8 for $35 at a run-of-the-mill sports shop.
The third important thing about dollies is the placement of the wheels. Certainly you lot can put them straight across from each other and it'll work, just many people recommend to stagger them. You'll encounter what staggering means by looking at the pictures below. The principal reason you should stagger is because the weight of the dolly will be more evenly spread throughout the base of operations of the dolly. If you come across a crash-land in the rails, it won't be as noticeable, if at all.
To mount the wheels, I used an "intricate" blueprint I cooked upwardly in this order: (from the outside to the inside) Bolt, wheel, nylon spacer, washer, bending iron, washer, nut.
Tighten the nut every bit far as you can, and it should stay firmly in place. You may need to loosen the nut a bit if you tighten information technology too far, to make sure the wheel turns properly.
In my blueprint I only used 8 wheels; 2 on each prong and an extra 2 on the lone prong. I've seen designs use only equally much, but I've also seen some use 12 or 16.
Most other designs volition demand to create their ain notches to agree the tripod legs. This pattern actually saved some work, but I recognize not everyone has a studio dolly lying around. What's cool nearly the holders is that they're adjustable, besides. However the downside is that they won't extent to their total length, due to the wheels obstructing the path.
Likewise note the track, which is fabricated out of 1″ PVC piping and continued with 3/four″ PVC jammed in-between them. I bought them in five′ lengths, which makes them easier to store and send. Of course, y'all could buy 10 foot lengths at a cheaper price and cut them yourself, but where's the fun in that?
On the ends of the runway I cut some extra PVC and used elbow joints to create a buffer at the end. This keeps the tracks together in case they're on a slight incline, or if someone is a scrap devil-may-care with their extremities.
A Really Cheap Way to Build a Portable Dolly
Above explains a very hands-on approach to create an affordable and collapsible dolly. However, I do admit that it involves a lot of handyman work. Here is a simple one we created for a recent Tv set pilot shoot.
Essentially, we took a used a Stone N Roller Multicart and put a sturdy box on tiptop of it.
So we placed a bunch of picture sandbags on top of it. Finally, nosotros rested our Sony FS7 right on superlative. The finished product looks like this:
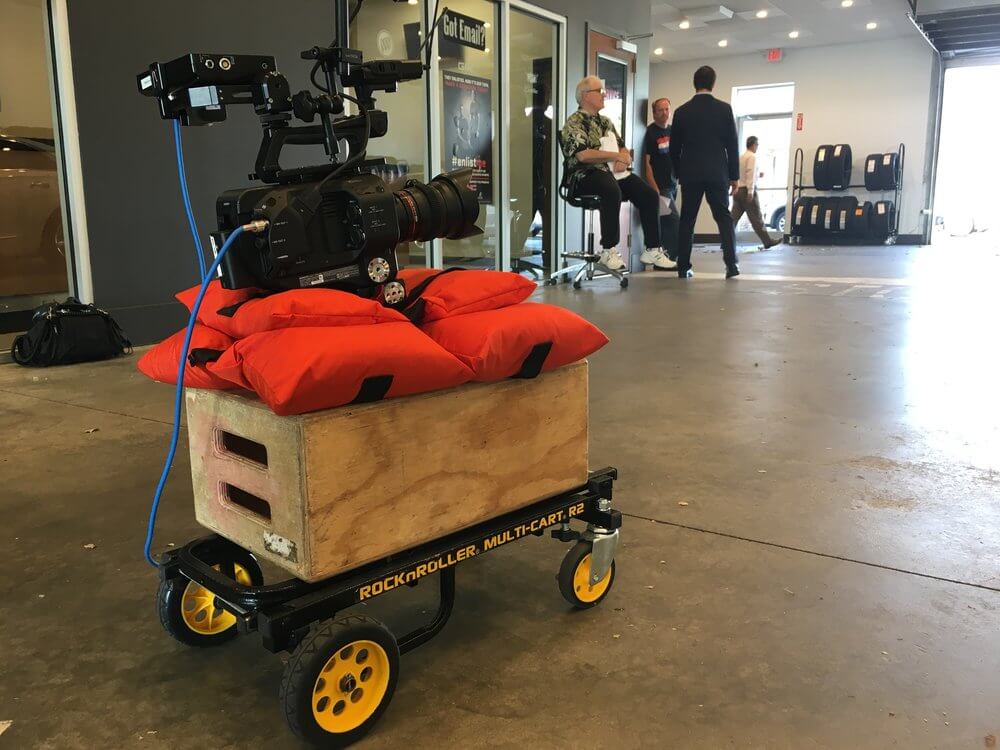
This contraction worked very well on our push-in shots, as the camera on wheels acted like they were camera on tracks. The cart provided enough stability to create an amazing shot of the scene. When yous're looking at this contraption, you might be thinking it's only good for push-ins. However, it can besides work for side-to-side motion.
We didn't use it for side-to-side motion in this shoot. But you should have easily turned the camera sideways and had the camera operator button the cart from left to right or right to left.
One affair of note. It is suggested that you accept at least two people operating this contraction. I person will really push button the camera. The other person will work to stabilize it. The last thing you need is for the camera to fall on the ground and price you $10K to replace information technology.
This setup will only price y'all the cart, a box and the sand bags. Nonetheless, any serious filmmaker will already have these tools so this setup can easily work for someone with the bones tools.
What if You're Really, Really on Budget
First, I presume you'll take a camera – whether it's a Sony FS7 or a Crimson. Just let'due south say you don't even have a cinema camera and all you had was an iPhone. It's nonetheless easy to create a "dolly." You might not be able to beget a motorized photographic camera dolly or you might not have the funds to rent one. Only all you lot really need is anything with wheels.
You can stand on a skateboard with your iPhone and have your friend button or tug yous along. You tin can be on rollers skates and take someone push you lot toward the actors for a classic button-in shot.
Point is yous just need to have an imagination to create an affordable camera dolly. Not everybody started with a RED Camera and a fancy Hollywood dolly like a Chapman motorized dolly.
Y'all tin hands create a lightweight, affordable camera dolly with an iPhone, two friends and a skateboard.
This is what it means to be an indie filmmaker. You work within your budget. You focus on story and potent characters. And yous brand the nearly of what y'all take.
A camera dolly is a great way to improve the production value of your film projects. Hopefully, these tips on creating an affordable dolly volition get yous going on your film project. Good luck!
Source: https://www.2bridges.nyc/filmmaking-guide/diy-how-to-build-a-camera-dolly/
Posted by: gallawaysagell.blogspot.com
0 Response to "How To Make A Camera Dolly"
Post a Comment