

How To Position Off Camera Flash
I've been agape of tackling off photographic camera flash photography for a long time. This by year I challenged myself to swoop in and see why so many photographers tin can't live without it! Don't get me wrong, I Love natural light and it's what I primarily shoot. But in that location are times when available low-cal is poor quality and I simply need more than to make a photograph pop! When balanced correctly with your available light, flash tin can coexist beautifully to heighten your images.
*Post contains affiliate links. Thanks in advance for supporting Click it Up a Notch.
Straight out of the box, a good place to starting time with your external wink is by practicing bouncing it and using TTL mode. Cheque out Laurie's post Speed Low-cal Photography for Beginners where she shares her offset experience with her flash. Once y'all are comfortable with bouncing and TTL style, in that location's a whole new earth of possibilities bachelor to you lot by operating your flash off camera and in manual mode!
Some of my favorite advantages of off camera flash photography (OCF):
- You're not limited to the low-cal that a window is giving you, or a certain time of twenty-four hour period where at that place'south perfect light. Yous can shoot mid-day, after peak sunlight hours or on a dark, overcast day.
- Wink makes colors pop on a gray, flat overcast 24-hour interval.
- By manipulating the flash and changing its position you can get a gorgeous shaped light around your subject.
- You can correct bad lighting or color casts with flash.
- You have control over ambient exposure i.east the sky AND the light on your subjects.
- You can put the low-cal in places a bounced flash couldn't go, like behind your subject or an obstacle for dramatic effects.
- OCF allows you to add light fifty-fifty if there'due south nowhere to bounce.
I'm planning to practise a series of posts on OCF because I can't perchance comprehend everything in one mail. In this post I'll cover the basics of equipment and settings with example images of how I used those settings. In my adjacent posts I'll cover things similar color correction gels, modifiers (i.e. diffusers and soft boxes), unlike types of light, and various creative ways to utilize OCF.

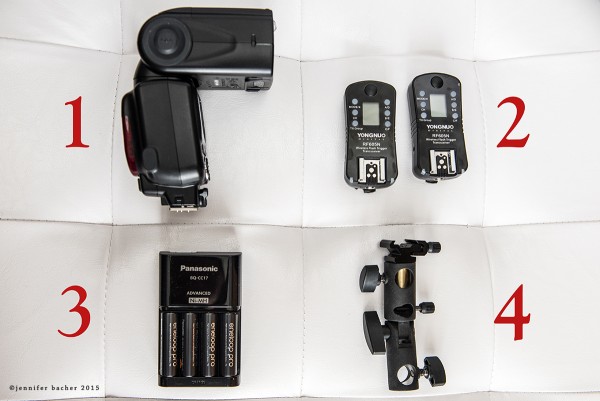
ESSENTIAL EQUIPMENT TO Become STARTED WITH OFF CAMERA Wink PHOTOGRAPHY
-
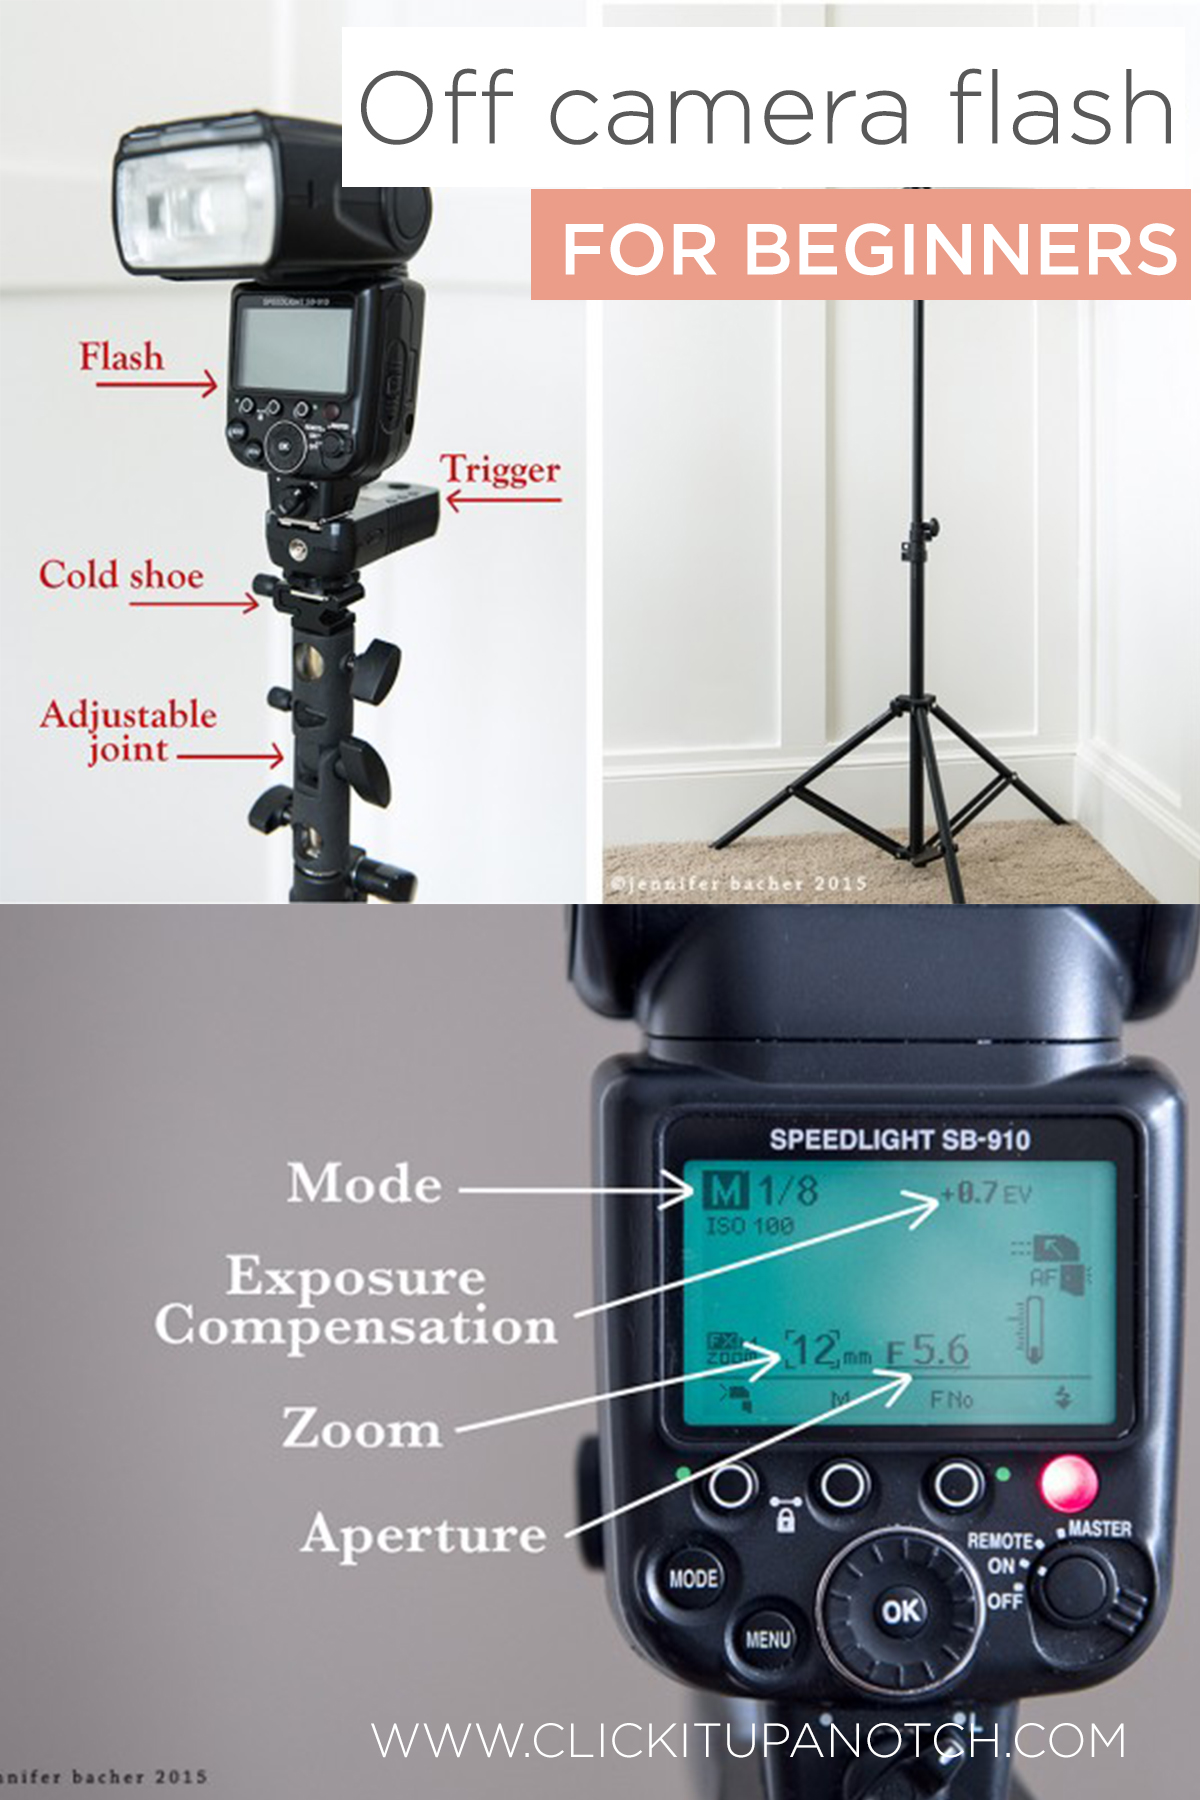
A Flash
There are many types of speedlights out there. They range from $30 for off brands to $500-$600 for summit Nikon or Canon versions. I wouldn't recommend ownership one for less than $150 as they may lack reliability and of import features yous volition demand. I take the Nikon SB-910 and highly recommend information technology. Or a less expensive option and corking for beginners is the Nikon SB-700. If yous are a Canon user, the Canon Speedlite 600 EX-RT is fantastic also.
Features to expect for:
– A rotating caput so you can bending your wink the management you desire.
– Consider whether information technology has TTL and/or ability to employ it manually. Both come in handy at different times.
– Make sure it'southward uniform with your camera.
-
Wireless Trigger and Receiver Set
The transmitter mounts onto the hot shoe of your camera, the receiver attaches to your wink. This is how your camera communicates with your wink. I accept the Yongnuo RF-605 North Wireless Wink Triggers, which are perfect (and affordable) for beginners because they are piece of cake to apply. Radio Popper and Pocket Wizard triggers are pop (but pricey) among professionals because they allow yous to control your flash ability remotely from your camera (rather than walking over to your wink to change the settings).
-
Ni-MH Batteries for your Flash and Triggers
Flash uses a ton of battery power, so plan on going through a lot of batteries! You tin save on cost past buying rechargeable. They also hold their charge longer than conventional batteries. In fact, they tin can hold up to 75% of their charge for a year or so! I use Eneloop Pro high chapters Ni-MH rechargeable batteries. This brand is the great for wink and lasts long. They besides concord their accuse fifty-fifty if your camera sits unused for a few weeks.
-
Umbrella Mount
This is how you connect your flash to your light stand up. Ane finish screws onto your stand, the other holds a cold shoe that you lot can mount your flash with the trigger onto.
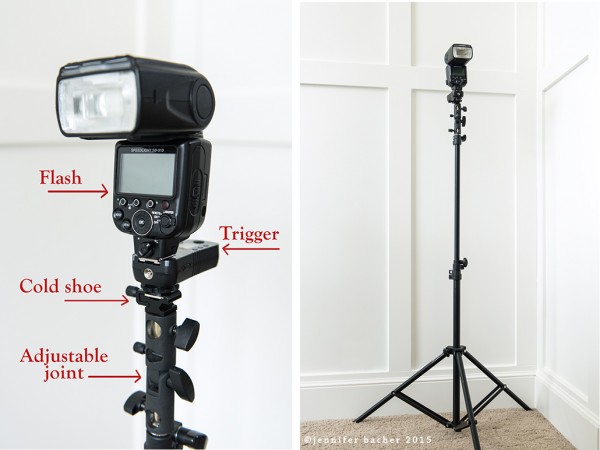
Don't exist fooled by the many types y'all come across out there. They all do the same thing! At that place is a small hole in the center where y'all tin can put an umbrella or other modifier. I utilize this Touch Umbrella Mount and this light weight Westcott low-cal stand. I wanted to exist able to move it around my business firm easily. I also got this Impact Saddle Sandbag to weigh it downward in example I want to utilize it outdoors with wind. If you desire something a little more sturdy, I recommend this Manfrotto Basic light stand. Once you start using umbrellas or softboxes yous may want a sturdier stand.
THE WRITING ON THE Wink
-
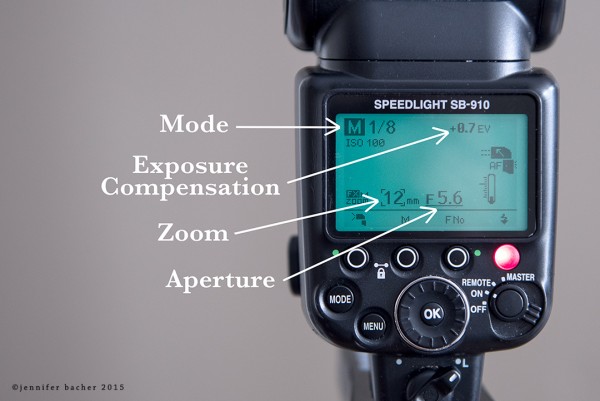
TTL and Transmission Modes
Your flash has modes just like your photographic camera. This is how you cull the amount of power y'all volition get from your flash.
TTL (Through the Lens) is when your flash emits a preflash that assesses the scene and decides how much light it should emit. TTL is beneficial when you or your subject is moving quickly and distances or ambient calorie-free is irresolute constantly. You let the flash do the thinking.
In Manual, y'all equally the lensman decide how much light your flash emits. Manual ability starts at ane/i (most powerful) and can go upwards to 1/128 (least power). I prefer using my flash manually because information technology gives me the almost control over flash intensity. Sometimes the flash gets confused in a high contrast scene and may not give you the right corporeality of calorie-free in TTL.
-
Exposure Compensation
In TTL you can adjust the amount of light by +/- ane/3 stop increments up to 2 or iii stops. Every stop halves or doubles the amount of light. It's similar to exposure compensation in P or A mode on your camera. You can punch it up or downwardly depending on how much light y'all need.
-
Zoom
You will too see on the back of the flash a number like 12mm, which refers to how narrow or wide your axle of low-cal is. Your camera will read the zoom number on your lens and will automatically gear up your zoom/mm on the back of your wink. However, there will exist times when you will desire to change that number manually. For instance, if you demand more coverage side to side yous would choose a wider mm setting. A narrower beam of light will be more than powerful and will reach farther.
-
Aperture
You will also see an f-terminate number like f/5.half-dozen on your flash. The aperture is another way you can control the amount of lite emitted. A lower f-stop number will give you more ability.
SHOOTING/Camera SETTINGS
Once you have the triggers attached to your camera/flash and it is placed where yous want it (or on a stand), you are set up to determine your settings!
With flash you have two different exposures to remember about; the exposure of your background, and the exposure of your flash. Before you even plough on your flash you need to think almost how much ambient lite yous want in the frame and how much low-cal yous desire to add (ie. light on your subject). Shutter speed, ISO, and aperture all play important roles in achieving these exposures. Here's a quick rundown on settings.
-
Sync Speed
Set your sync speed, or shutter speed on your camera first. Your flash will have a maximum sync speed. Mine is i/250. If you lot do non stay under your sync speed yous will get a lovely black bar beyond your paradigm like this outtake.
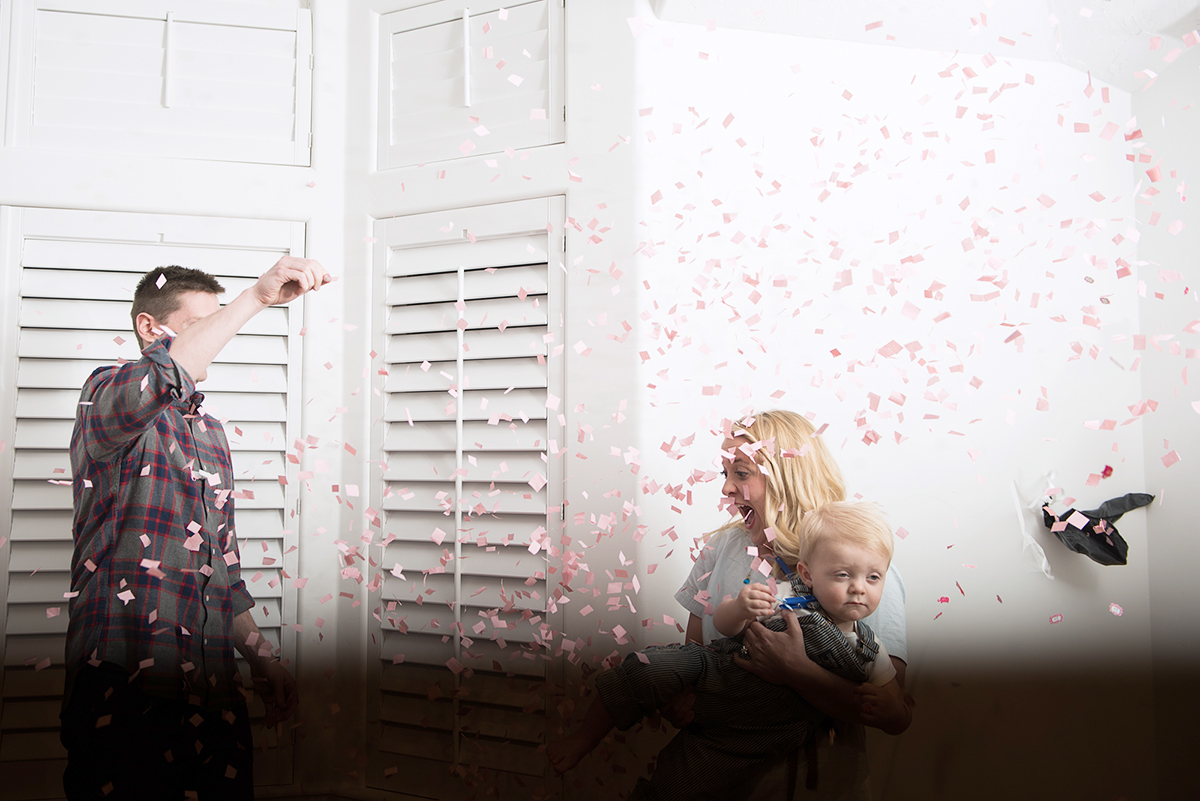
Hard lesson learned on this shot! I missed an important moment, when they popped a balloon to find out the gender of their second baby, because I moved my sync speed up a stop by accident. On most cameras the black bar tin can be avoided past setting your shutter speed at least one stop lower than the maximum sync speed of your flash.
-
Shutter Speed
Information technology controls ambient light. It doesn't affect your flash ability. A slower shutter that stays open up longer will allow more ambient light in. But considering a flash burst is very brusk, your shutter speed doesn't affect the power of the flash.
When choosing your shutter speed ask yourself how much ambient lite you want in your image? Do you want the heaven to look the fashion you come across it? Then choose a slower shutter speed i.e. 1/60. Practise you want to darken information technology for a more dramatic wait? And so enhance information technology i.east. 1/200. Merely never get above your sync speed. Flash freezes motion too, so equally long the low-cal from the flash is hitting your subject, they volition even so be abrupt at a slower shutter speed.
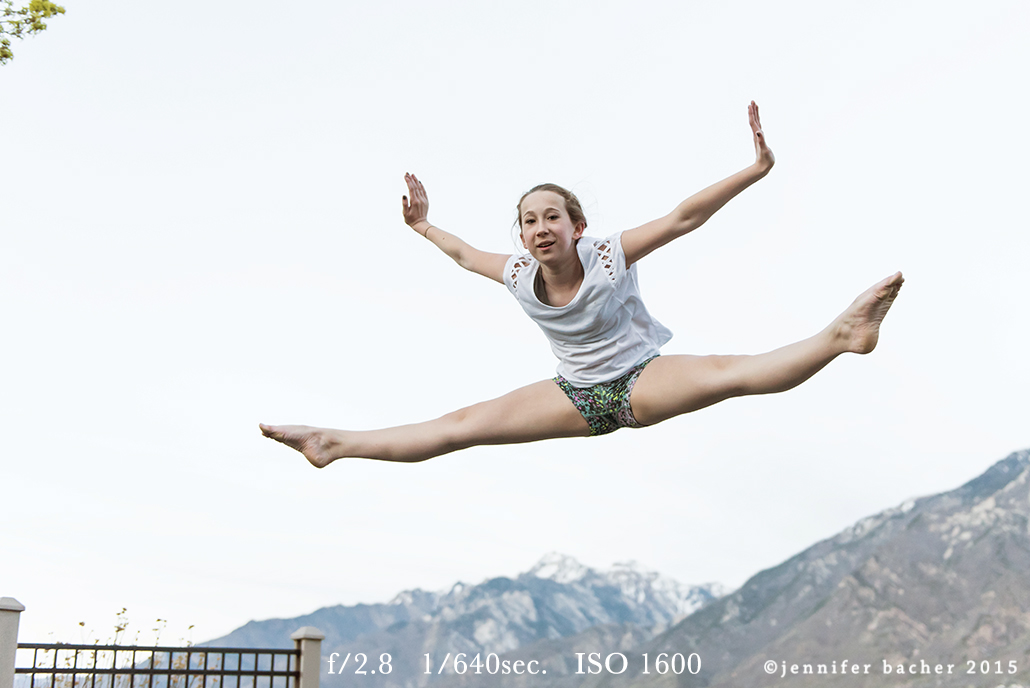
You may accept heard the phrasedrag the shutter, which means using a tiresome shutter speed to allow more ambient calorie-free to enter the lens. Keep in mind, however, that if you drag the shutter and there is a lot of ambient lite on your bailiwick, it will touch them if they are moving. For instance, in this next shot of my daughter her dorsum human foot is slightly "ghosting". That is because there is ambience sunlight falling on that foot. The remainder of her trunk is crisp because she had her back to the setting sun and I lit her front with flash. I've heard you tin gainsay ghosting by increasing the photographic camera'south sensitivity to around 800-1600 ISO. I still need to experiment with this.

As well in this shot I wanted to preserve the night heaven, but still light my girl. I had the wink sitting on a stand (with a diffuser) about 8 feet to the forepart/left of her. I set my flash to a lower ability i.due east. 1/64 so it wouldn't blow her out. I lowered my shutter speed on my photographic camera slightly to bring in the colors of the sky. As you experiment with flash you can also motion it closer or further away from your subject to see how this changes where the low-cal falls.
Here'due south a comparison shot 10 minutes subsequently where I exposed for her and used only natural light. I lost the colors in my sky. And lost the highlight and shadows that divers her form so nicely in the wink shot. Her eyes and much of her face await dark and apartment as well.
-
ISO and Discontinuity
Set these after you make up one's mind your shutter speed. Discontinuity controls the intensity of the light from your wink. A lower number i.east. f/two.8 gives you more power. If your flash is too bright, raise your aperture number i.east. f/sixteen. It's an like shooting fish in a barrel manner to adapt the power in photographic camera without having to walk over to your wink to change it. However, if a shallow DOF/shooting wide open is important to the shot, than leave your camera settings there i.e. at f/2.8 and lower your flash ability on the bodily wink if it's besides bright.
ISO affects both ambient low-cal and flash output. I usually tweak ISO last if I need to. It's nice to be able to go up or down in ISO to control the intensity of the wink once all my settings are where I want them to be. A good example would be if you are shooting at ISO 400 and your flash is as well bright and you can't reduce it anymore, you could use your ISO to tone information technology downwardly.
If you are looking for more power from your wink you lot tin practise iii things: 1. Plough upward the power on the wink, lower the aperture number in camera, or increase the ISO.
All this probably sounds complicated, simply I promise you it's but like learning manual fashion on your camera. Once you learn what each setting does, it's a matter of experimenting until it all clicks!
MAKING SENSE OF IT ALL
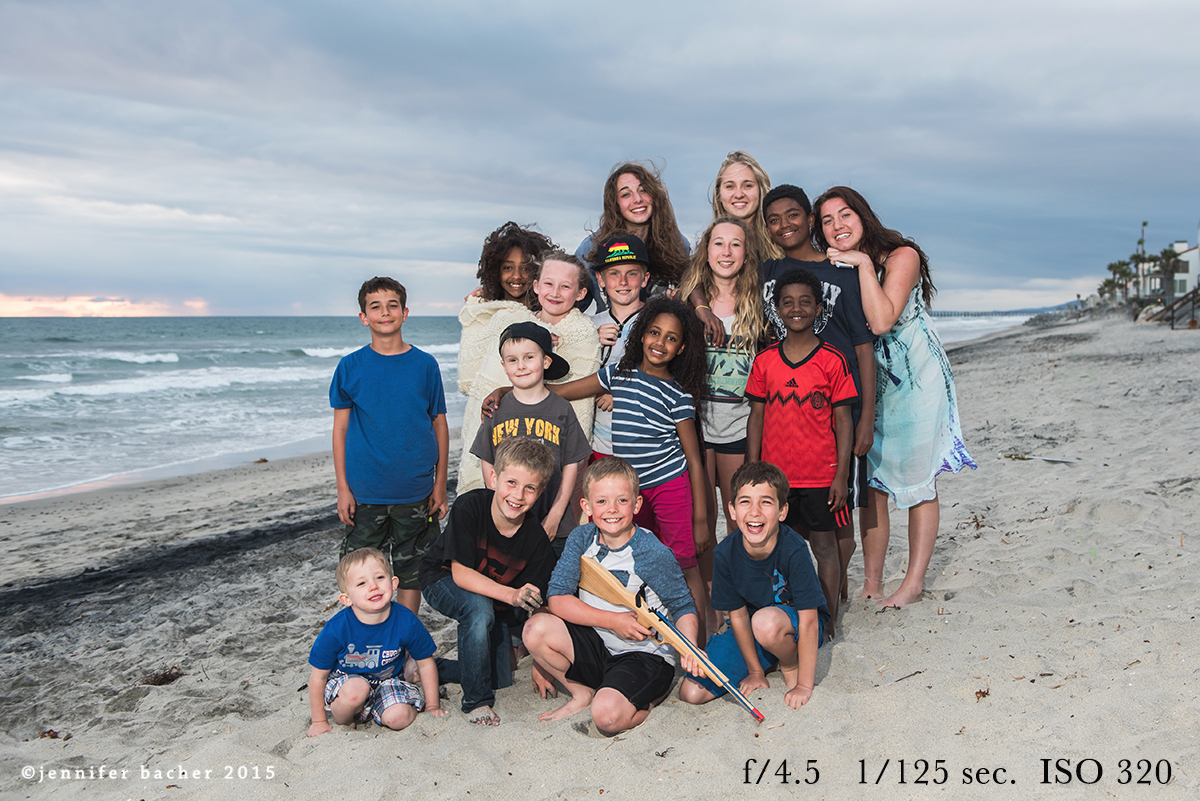
In this paradigm of my nieces and nephews I had someone concord my flash almost 8 feet in forepart and slightly to the correct of me. I beginning set my shutter speed to i/125 considering I wanted to preserve the colors and exposure in the sky every bit I saw information technology. I then used my flash to light the kids. I prepare information technology to medium power, around 1/16 because I needed to brand sure it lit the whole group from the distance it was at. Then I went upwardly and down in my discontinuity in camera until I landed on f/four.5 for a practiced exposure on the kids. I took several exam shots, and then made small adjustments in aperture and ISO until information technology looked right.
The sunday had just gone down and it was and overcast and grey. If I hadn't used a flash, my ISO would be cranked up loftier (thus more noise) to get decent exposure on my subjects. I'd also take adumbral faces, and a white sky with no cloud definition. What I love about this paradigm is the flash made the colors popular on an overcast twenty-four hour period and I was able to low-cal both a very dark skinned child and fair skinned kids evenly! If I had two flashes I would place the 2d flash behind them to create a hairlight to help carve up them more from the background.
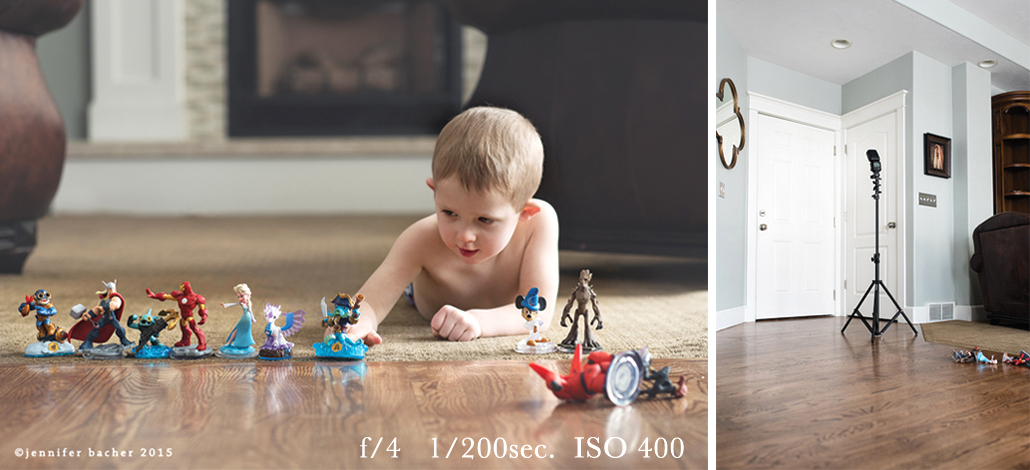
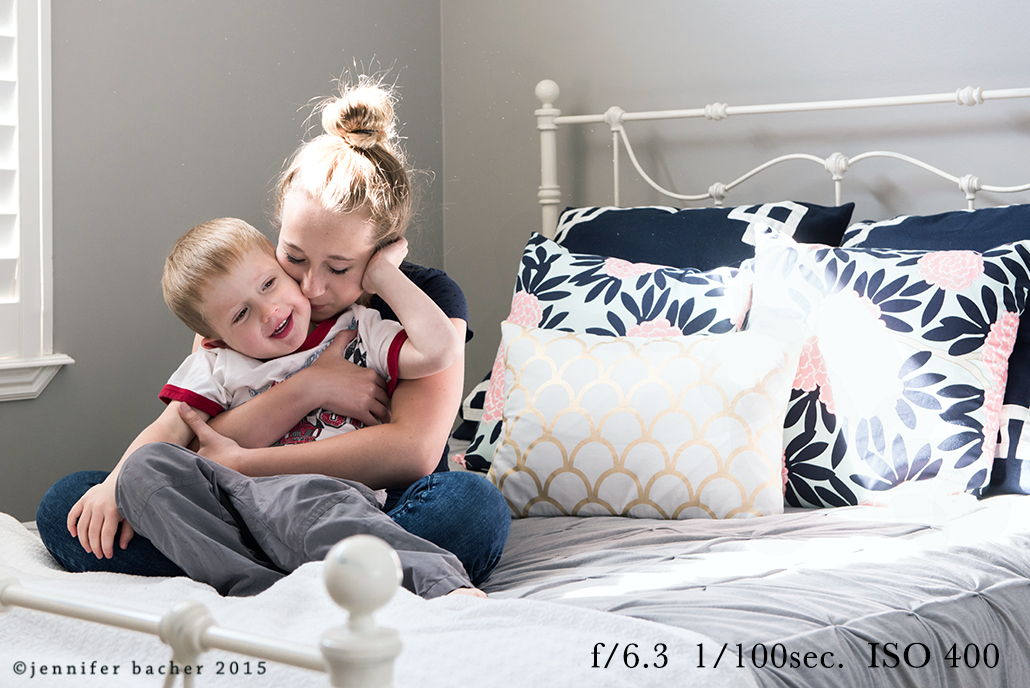
This image is an instance of using flash as a subtle make full low-cal indoors.
I set up my flash in a corner (see pullback) and bounced the low-cal out of the corner/ceiling. Information technology spreads beautifully and provides just a hint of make full. This is my favorite technique for indoor lifestyle shots because the light looks natural. There was a large sliding glass door at camera right that lit one side of him. He was quite a ways away from the door, so the other half of his confront was shadowed. The fill up light coming from the other side gave definition to his arm and face, which would otherwise exist nighttime. Information technology too lit the reverse side of the toys better. I fix my discontinuity at f/4 because I needed enough power to bounce and reach to the basis, just even so wanted a shallow DOF with a sliver of focus mainly on the toys.
Here's a couple more shots using the same corner bounciness technique.
Although there'southward a hotspot on my daughter's hair from the direct sunlight coming from the window, I allow information technology slide to capture the moment. The wink was placed opposite the window, pointed up at the corner of the ceiling and bouncing back at them. I liked how the flash provided fill up on their faces (since they were turned away from the window lite) and defined the otherwise shadowed side of their bodies.

For this bath image I had my flash set loftier on a shelf in the corner, pointed to bounce at the ceiling/corner. I set my discontinuity number low (f/ii) because I needed a lot of power to attain him and correct the yellowish overhead lights that were nowadays. Wink gives a daylight white balance and can be used to become rid of color casts and bad lighting likewise! I besides set my shutter speed to the maximum sync speed (one/160) because I wanted to let less of that yellowy tungsten light in and to freeze the movement of the water.
I promise this gave you lot a good intro to off camera wink photography and inspired yous to acquire more. I've experienced many "ah-ha moments" every bit I am experimenting with my settings! Although this may seem like a lot to take in, recollect there'southward many ways to do your settings. It's all personal preference and a matter of trial and error until you lot go the look y'all want. Feel gratis to ask questions in the comments!

Source: https://clickitupanotch.com/off-camera-flash-photography/
Posted by: gallawaysagell.blogspot.com
0 Response to "How To Position Off Camera Flash"
Post a Comment